Paint your garbage can

We replaced it with a sturdy (and much less expensive) plastic model but I just hated the "cheap" look. So I did something about it and you can too!
To me, there is little that is as unsightly as a white "plastic" garbage can in a kitchen you have labored so intensely to look beautiful. It sticks out screaming "Look at me"! And everyone does.
Every dirty finger print, every drip, every splash shows like a neon sign. Keeping it clean and presentable is a daily chore.
There aren't many options when choosing kitchen garbage cans. Manufacturers, for some reason, stay away from offering us models that are created with "decor" in mind. They aren’t offered in beautiful native bamboo or ornamental shell. They don’t come in Grecian Gray Stone or with a lovely marble finish. They think only of function and not what we have to look at each day.
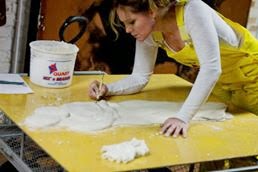
I resolved the problem by painting ours. Starting out as a tall, flip lid style, white plastic garbage can, I first cleaned it, gave it a quick sanding, then wiped it with pure white vinegar (to give it some tooth).
I then gave it two coats of "BIN" primer (found at your local hardware of home store). This primer is my favorite since it sticks beautifully to every surface I've ever used it on including slick ceramic tile.
I coated it with a single coat of light brown, water based paint as my base color.
Creating a darker shade of the same color, I mixed dark brown paint with my base color and sponged it on once the base coat had completely dried.
Using the dark brown paint alone, I sponged on a random pattern over the surface to create depth. When sponging one color over the top of another, be sure to blend. This creates a softer, more appealing design. To blend, simply continue to blot until the two colors nearly become one.
To give further detail to the front of the can, I stenciled an ornate design in gold with acrylic paint. I then applied two coats of polyurethane to protect the finish and the result was fabulous! Not only did my husband comment on its beauty, but the first comment from my neighbor was: "Hey! Where did you get the cool garbage can?"
This technique works with any color choice so have a blast choosing the color you want yours to be.
Now we have a unique and attractive garbage receptacle that does not detract from the decorating I have done in the room, but rather enhances it with beauty and design.
Give yours a new look today!
Victoria Larsen is a professional wall stencil designer and interior specialist. Her products and ideas have been featured in Better Homes and Gardens, Women’s Day, Craft Trends, Creating Keepsakes, Rubber Stamping Retailer and Memory Maker magazines and The Wall Street Journal. Visit Victoria on line at http://www.victorialarsen.com. Blog: http://victorialarsen.typepad.com

Love the idea and the look
ReplyDelete